If you have been dreaming about a sewing room that actually works for you, you are in the right place. The truth is, you do not need a huge space or a big budget to create a room that makes sewing feel like therapy instead of a chore.
Whether you have a full spare bedroom or just a small corner near the laundry room, the right setup changes everything. A well-planned sewing room helps you find your tools faster, sew longer without pain, and actually finish more projects. Studies show that an organized workspace can boost productivity by up to 20 percent. Imagine what that means for your next quilt or dress project.
In this guide, you will find 14 sewing room ideas that cover layouts, lighting, storage, decor, and more. Every idea is practical, budget-friendly, and easy to copy. Let’s turn your sewing space into your favorite room in the house.
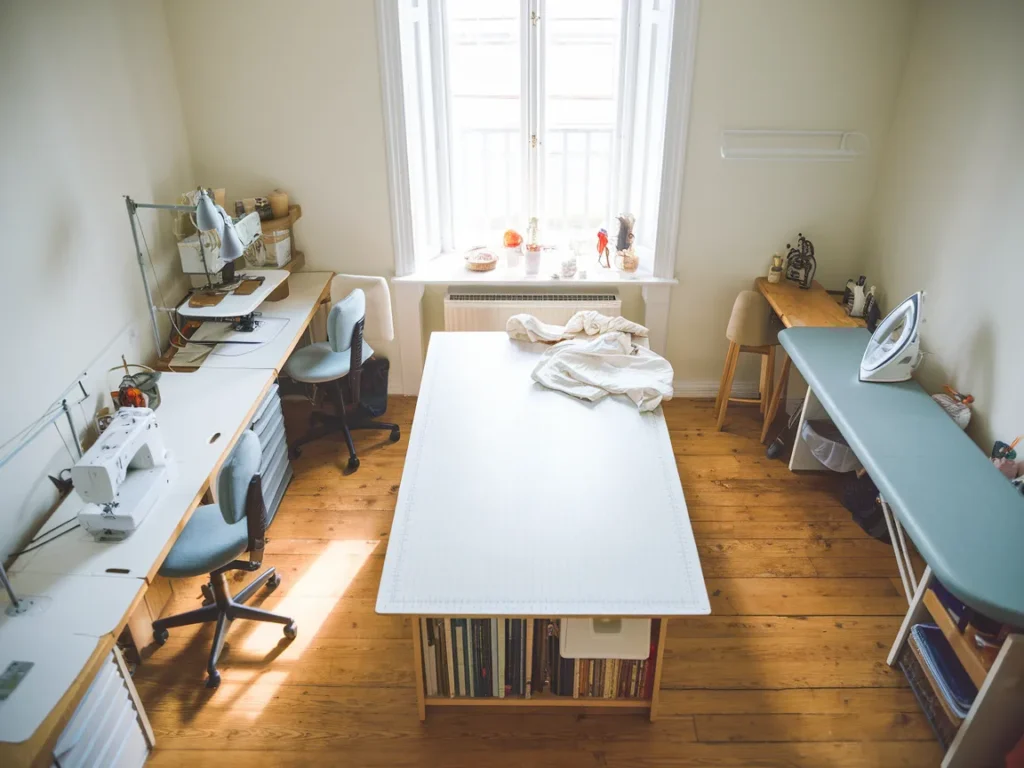
1. Plan a Smart Layout With the Sewing Triangle
The single best thing you can do for your sewing room is plan where your three main stations go. Think of it like a kitchen triangle. Your sewing machine, cutting table, and ironing station should all be close to each other.
Why the Sewing Triangle Matters
When these three stations are too far apart, you waste time walking back and forth. One sewist shared that after moving her ironing board from another room into her sewing space, she nearly doubled her output. That is the power of a good layout.
How To Set It Up
Place your sewing machine on one wall. Put your cutting table in the center or along the opposite wall. Set your pressing station within arm’s reach. If you can spin your chair and reach two stations without standing, you are in the sweet spot.
For a smaller space, an L-shaped desk works great. It gives you a wide surface for your machine on one end and room for cutting on the other. You can even push a rolling cart into the open corner for extra storage.
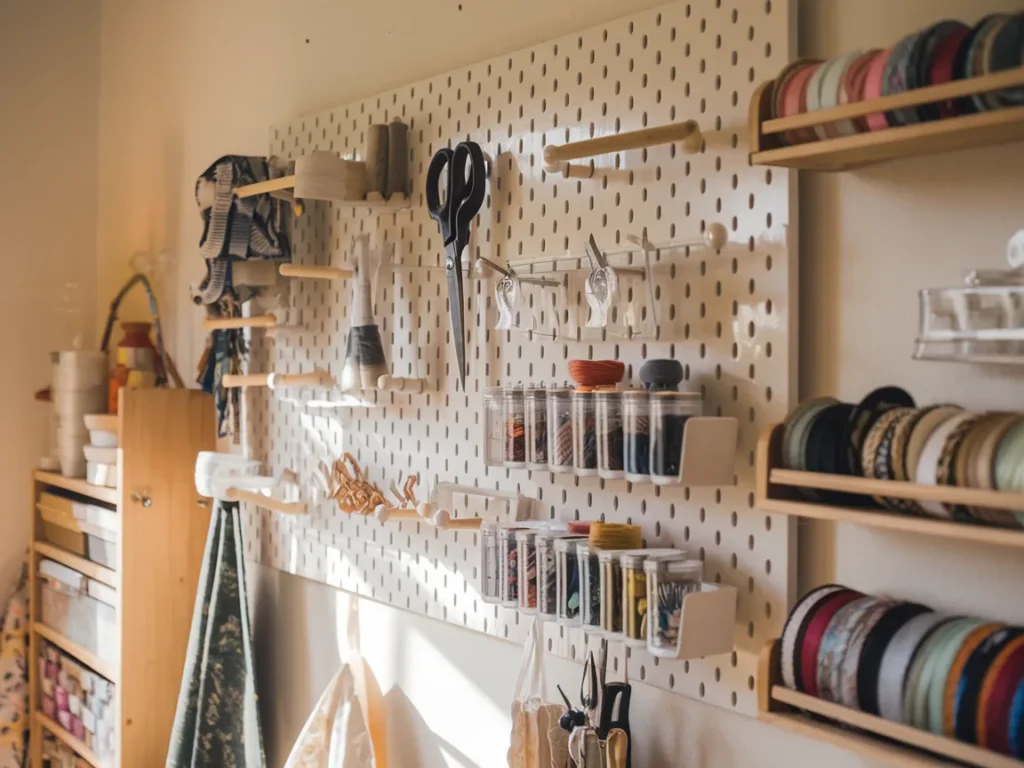
2. Use a Pegboard Wall for Tool Storage
If there is one sewing room upgrade that gets mentioned again and again by experienced sewists, it is the pegboard. A pegboard turns a blank wall into a storage powerhouse. Scissors, rulers, measuring tapes, thread spools, and rotary cutters all get their own spot right where you can see them.
Setting Up Your Pegboard
You can buy a 4-by-8-foot board at most hardware stores for around $20. Have them cut it to your wall size right there. Paint it with two coats of satin or semi-gloss wall paint in a color you love. When you hang it, use spacers or washers behind the screws so the board sits about half an inch off the wall. This gap lets the hooks slide in from the back.
Best Pegboard Accessories for Sewists
Use J-hooks for scissors. Use L-hooks for rulers. Small clear jars or bins work great for bobbins, pins, and snaps. Spice rack shelves (yes, from the kitchen section) make perfect holders for ribbon rolls and small containers. Group your tools by task so cutting tools are together, marking tools are together, and measuring tools are together.
Research suggests that visual organization can reduce the time you spend searching for supplies by up to 30 percent. That is time you get back for actual sewing.
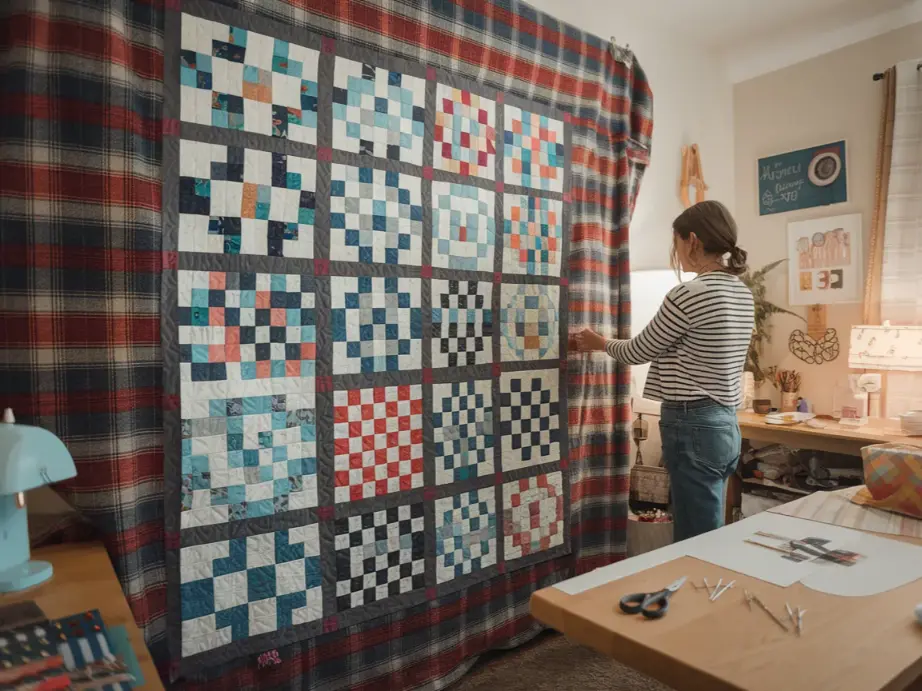
3. Create a Design Wall for Planning Projects
A design wall is one of the most underrated sewing room additions. It is simply a large surface covered with flannel or batting where you can pin fabric pieces, quilt blocks, or pattern layouts. This lets you see your whole project at once before you sew a single stitch.
DIY Design Wall on a Budget
You do not need anything fancy. A large piece of foam board or insulation board covered in white flannel does the job. Lean it against the wall or mount it with a few screws. Some sewists use felt-covered bulletin boards from the office supply store.
Why It Changes Your Workflow
A design wall takes the guesswork out of layout. Instead of arranging blocks on the floor (hello, sore knees), you can stand back and see how colors and patterns work together. It is like a canvas for your creativity.
If you love planning your spaces, you might also enjoy exploring bedroom decor ideas and living room ideas for more layout inspiration.
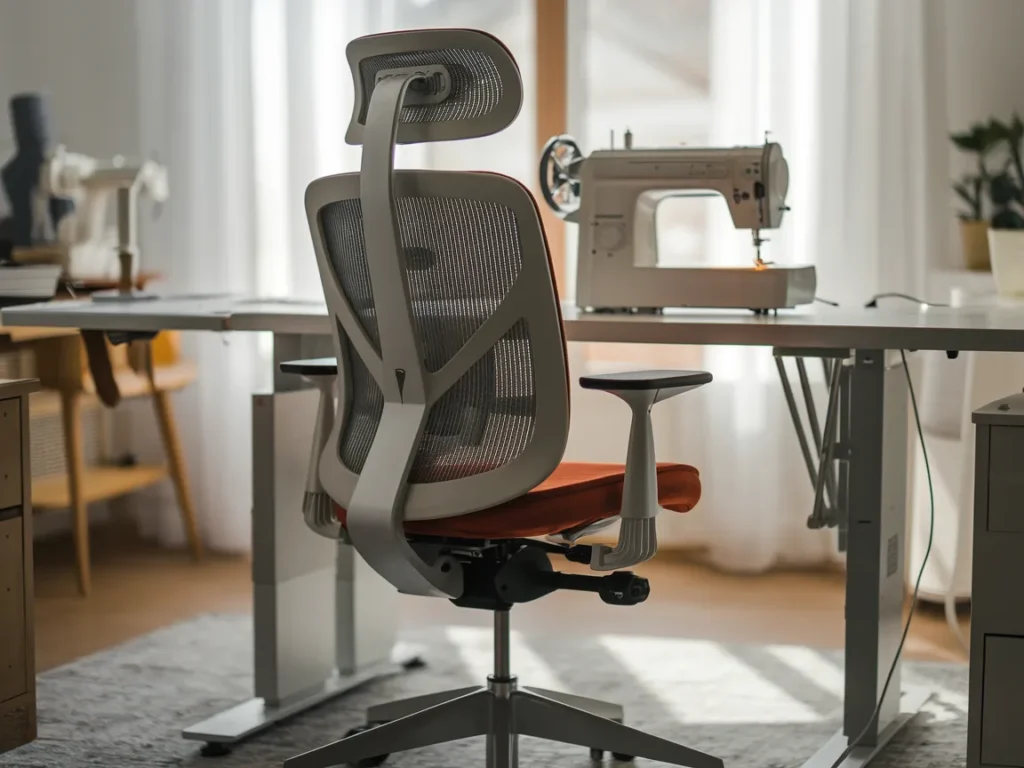
4. Invest in an Ergonomic Chair
Here is something many sewists ignore until their back starts hurting. The chair you sit in matters more than you might think. If you sew for several hours at a time, a basic folding chair or kitchen chair is not doing your body any favors.
What To Look For
Choose an office chair with adjustable height, lumbar support, and a seat that does not slope forward. Your knees, hips, and elbows should all be at about 90 degrees when you sit at your machine. Armrests are nice but make sure they do not bump into your sewing table.
The Health Connection
According to ergonomics research published by the Canadian Centre for Occupational Health and Safety (CCOHS), poor seating posture during detailed work contributes to back, neck, and shoulder pain over time. One study on sewing workstation design found that improper chair height was linked to pain in the upper and lower back in over 93 percent of cases studied. Spending $100 to $200 on a good chair now saves you pain and medical visits later.
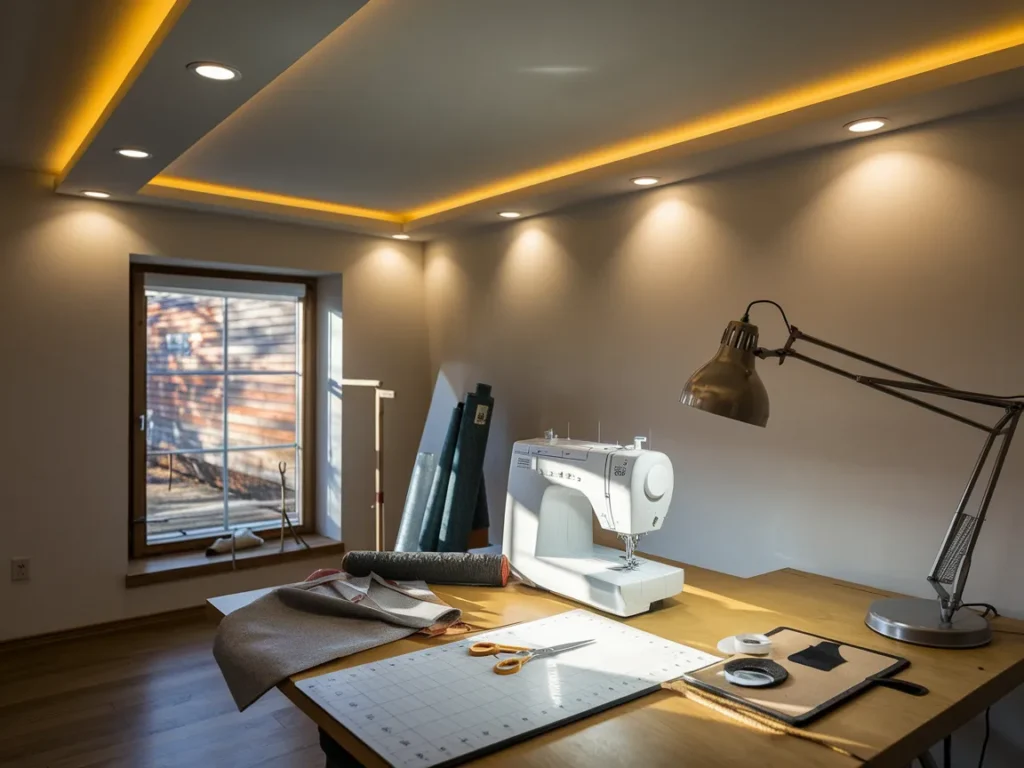
5. Layer Your Lighting for Better Visibility
Lighting is one of the most overlooked parts of a sewing room. Bad lighting causes eye strain, headaches, and mistakes. Good lighting makes you sew faster, more accurately, and with less fatigue. Experts estimate that proper lighting can increase productivity by about 10 percent and reduce errors by up to 30 percent.
The Three Layers of Light
You need three types of light working together. First, ambient lighting fills the room evenly. Overhead ceiling fixtures or recessed lights handle this. Second, task lighting shines directly on your work area. A bright, adjustable desk lamp or an under-cabinet LED strip next to your machine is key. Third, natural light from a window boosts your mood and helps you see true fabric colors.
Placement Tips
Position your task light above and slightly in front of your needle area. Make sure it does not cast shadows on your fabric. If your room has a window, place your cutting table near it so you get the best natural light for reading patterns and matching colors. The CCOHS notes that full-spectrum lighting is especially important in sewing where color judgment matters.
For more lighting ideas, check out the 3-layer lighting rule for a deeper look at how layered light transforms any room.
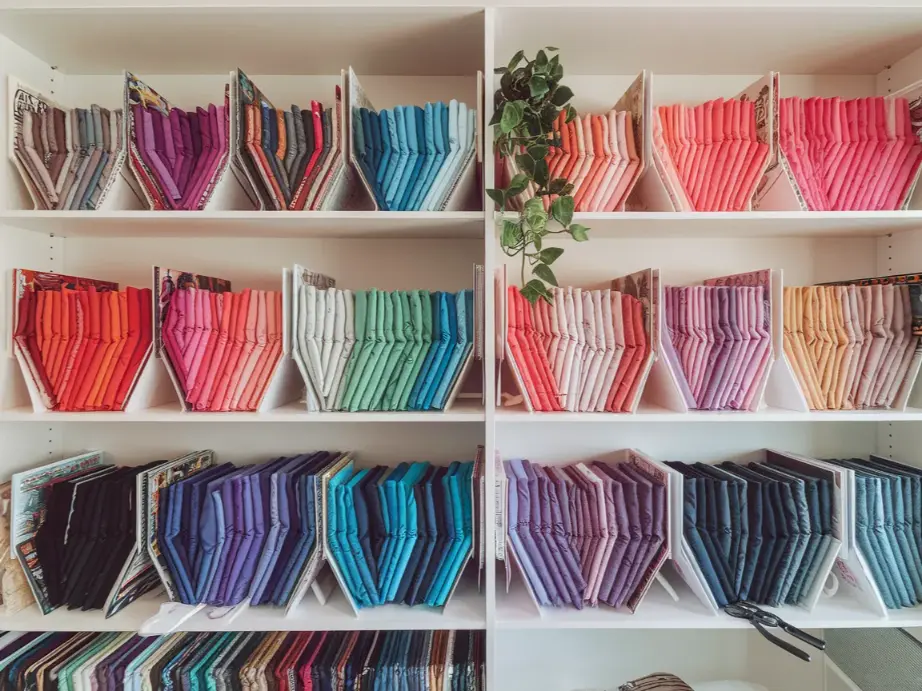
6. Organize Your Fabric Like a Library
Fabric is beautiful. But it can also take over your entire room in a heartbeat. The key to keeping your fabric stash under control is treating it like a library. Every piece needs a spot, and you should be able to see what you have at a glance.
The Vertical Filing Method
One popular method among quilters is wrapping fabric around cardboard or comic book boards, just like mini bolts. Then stand them upright on a shelf, sorted by color or project. You can see every piece without digging through a pile. This method also prevents wrinkles and keeps your fabric in better shape.
Shelves vs. Bins
Open shelves let you see your fabric and use it as decor. Clear bins protect fabric from dust but still let you peek inside. Closed drawers hide everything and work great if you want a cleaner look. Pick the method that matches your room’s style.
A good habit is to go through your stash once or twice a year. If you have not touched a piece in over two years, it might be time to donate it to a local quilting group, school, or thrift store.
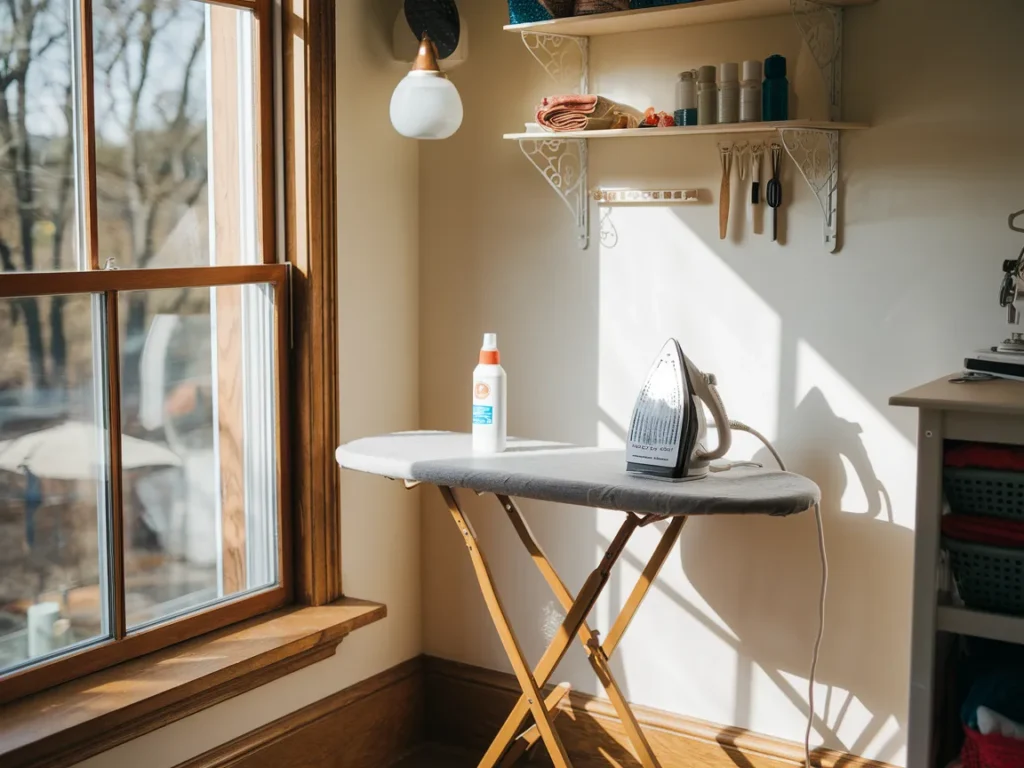
7. Add a Dedicated Ironing Station
Ironing and pressing are part of every sewing project. Yet many sewists still keep the ironing board in the hallway or bedroom closet. Bringing your pressing station into the sewing room saves time and keeps your flow going.
Full-Size Board vs. Pressing Mat
If you have space, keep a full-size ironing board set up and ready to go. If space is tight, a pressing mat on a side table or the end of your cutting table works just as well. Many sewists love the wool pressing mats because they absorb steam from both sides, giving you crisper seams.
Best Placement
Set your ironing area within one or two steps from your sewing machine. Many experienced sewists say this small change made the biggest difference in how fast they complete projects. An ironing board height that lets you press with your arms in a comfortable, relaxed position (not hunched over) is important for your shoulders and neck.
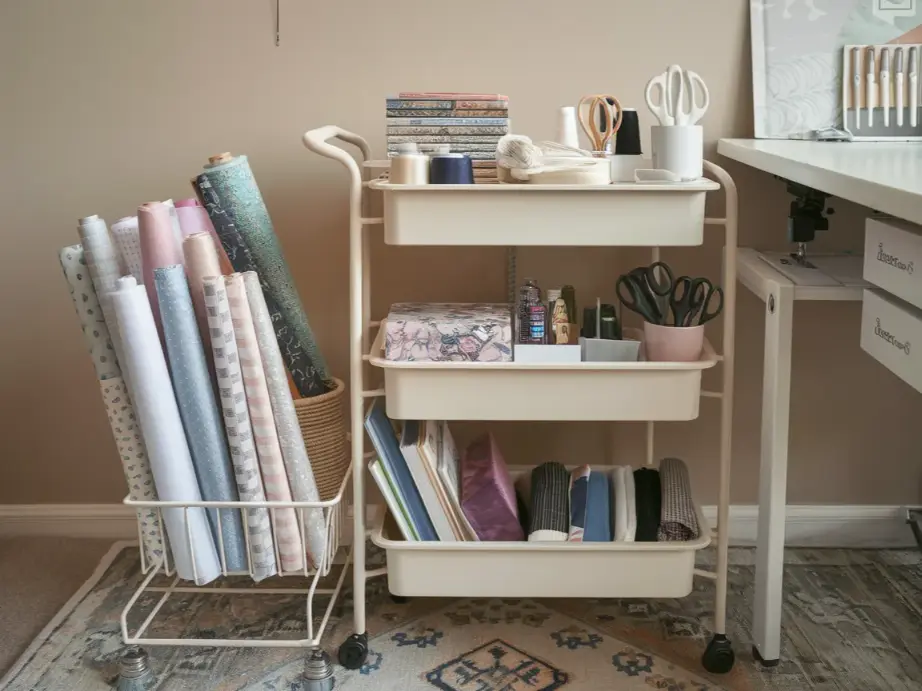
8. Use Rolling Carts for Flexible Storage
Rolling carts are a sewing room secret weapon. They give you portable, flexible storage that moves wherever you need it. Working at the cutting table? Roll the cart over. Switching to the machine? Pull it beside you. Done for the day? Tuck it under a table or in a corner.
How To Assign Carts by Task
Try giving each cart a job. One cart holds your current project and its supplies. Another holds your pressing tools and starch. A third might carry your quilting rulers, mats, and rotary cutters. This way, you never have to search for anything. You just roll the right cart to the right station.
Best Cart Options
Three-tier metal or plastic utility carts are popular because they are affordable, lightweight, and fit almost anywhere. Look for carts with wheels that lock so they do not roll away mid-project.
Rolling storage is especially useful in rooms that serve double duty. If your sewing room is also a guest room, you can quickly roll your supplies into a closet before visitors arrive.
9. Claim a Closet for Hidden Storage
Not every supply needs to be out in the open. A closet inside or near your sewing room can hold the bulk of your stash while keeping the room looking neat.
Closet Organization Ideas
Hang fabric on tension rods by draping yardage over them. Stack clear bins on shelves and label each one. Use an over-the-door shoe organizer for small tools like seam rippers, marking pens, tape measures, and extra bobbins. Slide pattern storage boxes onto the top shelf.
No Closet? No Problem
If your room does not have a closet, a tall armoire, a bookshelf with a curtain, or even a repurposed china cabinet works beautifully. The goal is to get seasonal or rarely used supplies out of your active workspace so you have more room to create.
If you enjoy organizing ideas, you might love these pantry organization ideas for similar tips on using shelves and containers.

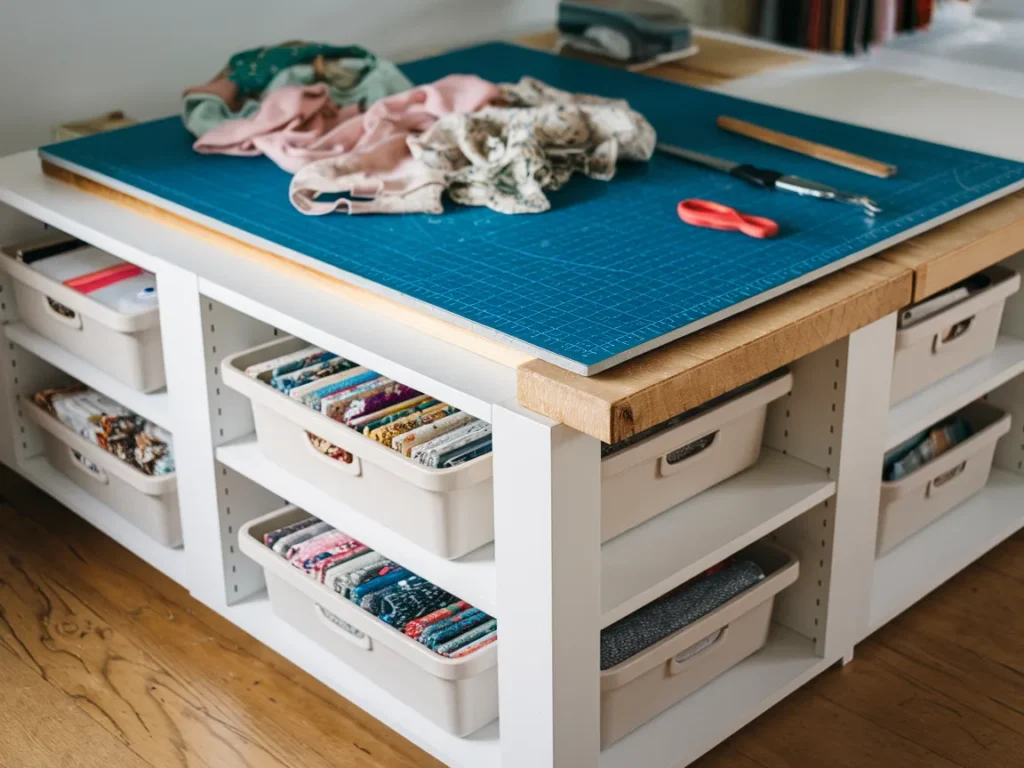
10. Set Up a Dedicated Cutting Table at the Right Height
Cutting fabric on the floor or on a table that is too low leads to sore backs and uneven cuts. A proper cutting table set at the right height makes a huge difference.
Ideal Cutting Table Height
Your cutting table should be at about waist height. This lets you stand upright while cutting, without bending or hunching. For most people, that is between 34 and 38 inches tall. If you cannot find a table at the right height, bed risers under a standard table can add the extra inches you need.
DIY IKEA Hack Cutting Table
One of the most popular sewing room hacks is building a cutting table from two IKEA shelf units with a tabletop across them. This gives you a wide, sturdy surface with tons of storage underneath for fabric bins. Many sewing bloggers have built versions of this table for under $200.
Protecting Your Surface
Always use a self-healing cutting mat on top. It protects your table and gives you a grid for straight cuts. Mats come in sizes from small to full-table coverage.
11. Make the Room Feel Yours With Personal Touches
Your sewing room is a creative space. It should feel inspiring, not like a factory. Adding personal touches makes you want to spend time there. And the more time you spend in your space, the more projects you finish.
Easy Ways to Add Personality
Hang finished projects or quilt blocks on the wall as art. Display colorful thread spools as decor. Add a small plant or vase of flowers. Pin inspiration photos or fabric swatches to a mood board. Play music through a small speaker. Put up a motivational quote that makes you smile.
Color and Mood
Paint the walls a color that makes you feel calm and creative. Soft whites, light blues, warm greens, and even bold accent walls all work. The color of your sewing room can set the mood for your entire creative session.
For more ideas on how color impacts your mood, check out these bedroom color scheme ideas and kitchen color ideas.

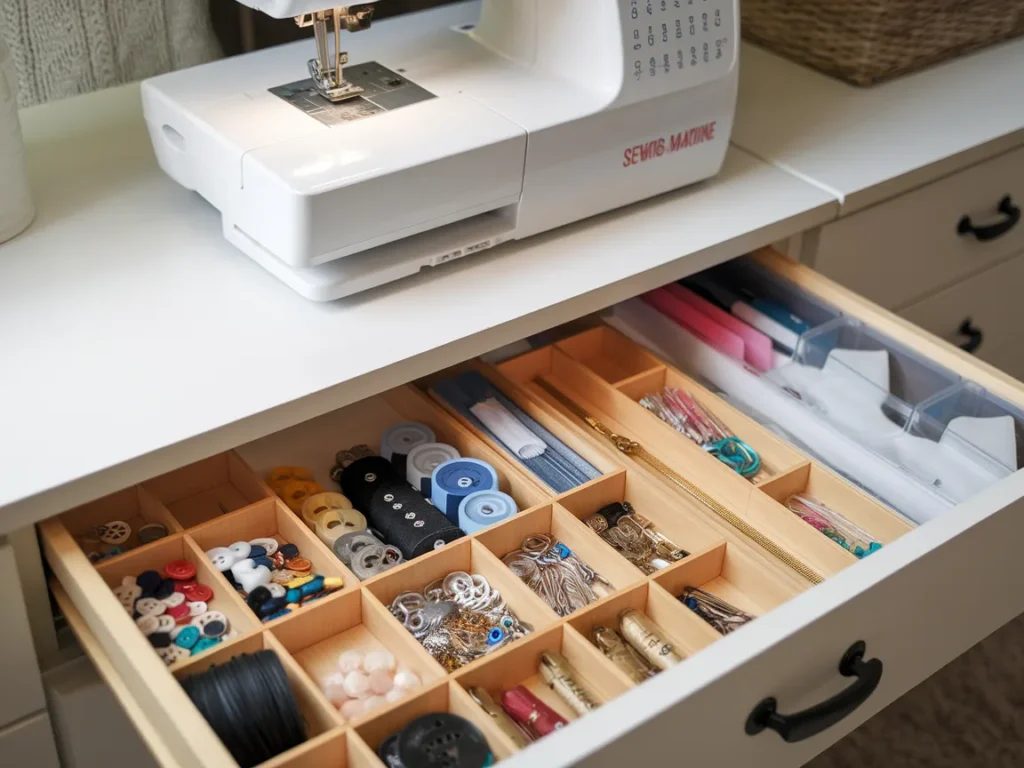
12. Use Drawer Dividers for Small Notions
Buttons, bobbins, zippers, snaps, needles, seam rippers, pins. The small stuff piles up fast. Without a system, drawers turn into a jumbled mess where you can never find what you need.
How To Set Up Dividers
Adjustable bamboo or plastic drawer dividers create neat little compartments for each type of notion. Give every item a home. Buttons go in one section. Bobbins in another. Zippers in a third. When everything has a spot, you spend less time searching and more time sewing.
Alternative Small Storage Ideas
If you do not have drawer space, clear jars on a shelf, small bins on a pegboard, or even a fishing tackle box work great. The key is being able to see your supplies without opening anything.
13. Create a Multi-Purpose Sewing Room and Guest Room
Not everyone has the luxury of a room that is just for sewing. If your sewing space also serves as a guest room, home office, or playroom, you need smart solutions to make both functions work.
Dual-Purpose Furniture
A daybed or futon gives guests a place to sleep while taking up less space than a full bed. A fold-down table mounted on the wall can serve as your cutting surface, then fold flat against the wall when guests come. A sewing cabinet that closes to hide your machine keeps the room looking tidy.
Rolling and Folding
Use rolling carts and collapsible tables so you can rearrange the room quickly. Store your sewing supplies in matching bins that look clean when stacked on a shelf. The goal is to be able to switch the room from “sewing mode” to “guest mode” in about 15 minutes.
Many sewists share that having a dual-purpose room actually motivates them to stay organized, because they know guests might see it at any time.
14. Go Vertical With Floor-to-Ceiling Storage
When floor space is limited, the walls are your best friend. Going vertical with shelves, cabinets, and hanging organizers gives you storage that does not eat into your workspace.
Types of Vertical Storage
Floating shelves hold fabric, books, and decorative items. Tall bookcases store bins and project boxes. Wall-mounted thread racks keep spools visible and sorted by color. Over-the-door organizers use wasted space behind a door. Even the space above a doorway can hold a small shelf for items you rarely reach for.
Making Vertical Storage Look Good
The trick to vertical storage that does not look cluttered is to use matching containers, stick to a color palette, and leave some open space between items. A wall of neatly arranged fabric can look as beautiful as any piece of art.
If small space design interests you, check out these small living room design ideas for more ways to make tight spaces feel bigger.
Sewing Room Ideas Comparison Table
| Idea | Best For | Budget | Space Needed |
| Sewing Triangle Layout | Faster workflow | Free (rearrange) | Any size |
| Pegboard Wall | Tool visibility | $20–$50 | Small wall |
| Design Wall | Quilters, planners | $15–$40 | Medium wall |
| Ergonomic Chair | Comfort, health | $100–$300 | Minimal |
| Layered Lighting | Eye health, accuracy | $30–$150 | Any size |
| Fabric Filing System | Large fabric stash | $10–$30 | Shelf space |
| Ironing Station | Pressing efficiency | $20–$50 | Small corner |
| Rolling Carts | Flexibility | $20–$50 each | Minimal |
| Closet Storage | Hiding bulk supplies | $0–$80 | Closet or cabinet |
| Cutting Table | Accurate cuts, posture | $50–$200 | Medium floor |
| Personal Decor | Inspiration, mood | $0–$50 | Any size |
| Drawer Dividers | Organizing notions | $10–$25 | Drawer space |
| Dual-Purpose Room | Shared spaces | $50–$300 | Full room |
| Vertical Storage | Small rooms | $30–$150 | Wall space |
FAQS
What is the best layout for a sewing room?
The sewing triangle layout works best for most people. Place your sewing machine, cutting table, and ironing station in a triangle pattern so you can move between them quickly. This setup cuts down on wasted steps and keeps your creative flow going. Even a small room can use this concept by placing stations on opposite walls.
How do I organize a small sewing room?
Focus on vertical storage first. Use pegboards, floating shelves, and over-the-door organizers to get supplies off your work surfaces. Rolling carts and collapsible tables save floor space. Clear bins let you see what you have without opening anything. The goal is to keep only what you use regularly within arm’s reach.
What lighting is best for a sewing room?
Layer three types of light. Use ceiling fixtures for general room light. Add a bright, adjustable task lamp near your sewing machine. Let in as much natural light as possible from windows. Full-spectrum bulbs help you see true fabric colors, which is especially important for color matching and detail work.
How much does it cost to set up a sewing room?
You can set up a basic sewing room for $200 to $500 if you repurpose furniture you already own and use DIY storage solutions. A more complete setup with a cutting table, ergonomic chair, lighting, and pegboard might run $500 to $1,500. Many sewists build their dream room over time by adding one improvement each month.
Do I need a whole room for sewing?
No. A dedicated corner, a closet, or even a section of a shared room can work beautifully. The key is having a permanent spot for your machine so you do not have to pack it up after every session. When your sewing area is always ready, you sew more often.
What is the best flooring for a sewing room?
Hard flooring like laminate, hardwood, or vinyl is best. Fabric scraps, threads, and pins are much easier to clean off a hard floor than carpet. If you stand a lot while cutting or pressing, add an anti-fatigue mat under your cutting table for extra comfort.
How do I make my sewing room look nice?
Use your supplies as decor. Thread racks, fabric stacks, and finished projects can be displayed like art. Choose a color scheme for your storage containers. Add a plant, fairy lights, or a framed quote. When your room looks good, you feel more inspired to create in it.
Final Thoughts
Building your dream sewing room does not have to happen overnight. Start with the idea that excites you most, whether it is a pegboard wall, better lighting, or finally getting a proper cutting table, and work from there.
The best sewing room is one that fits your life, your space, and the way you like to work. It does not need to look like a magazine photo. It just needs to help you create with less stress and more joy.
Pick one idea from this list and start this weekend. Your future self, happily sewing in an organized and comfortable room, will thank you.

