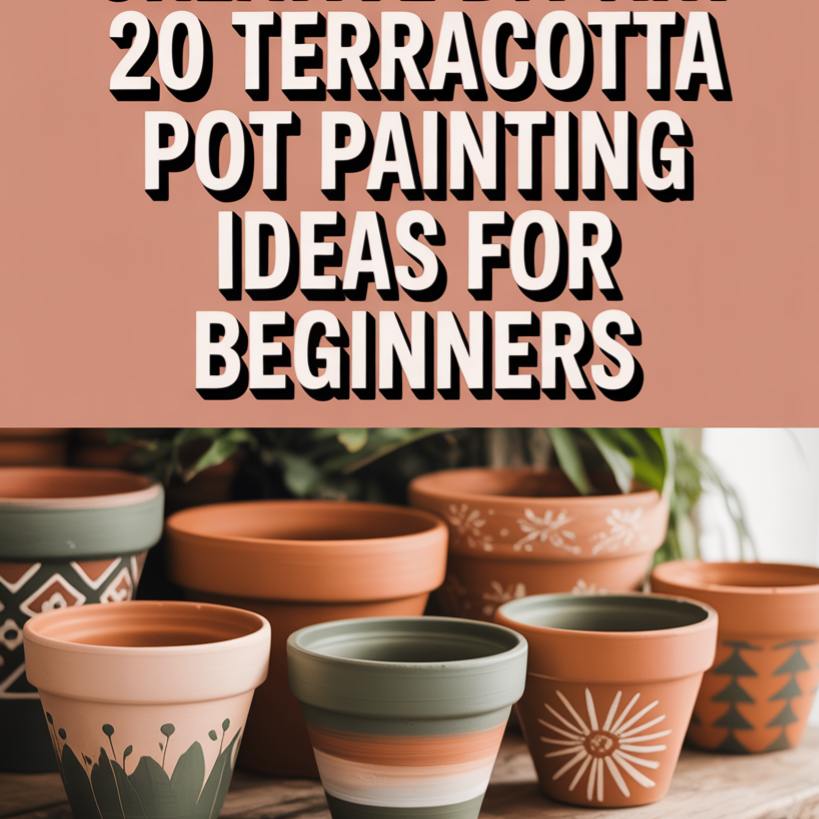
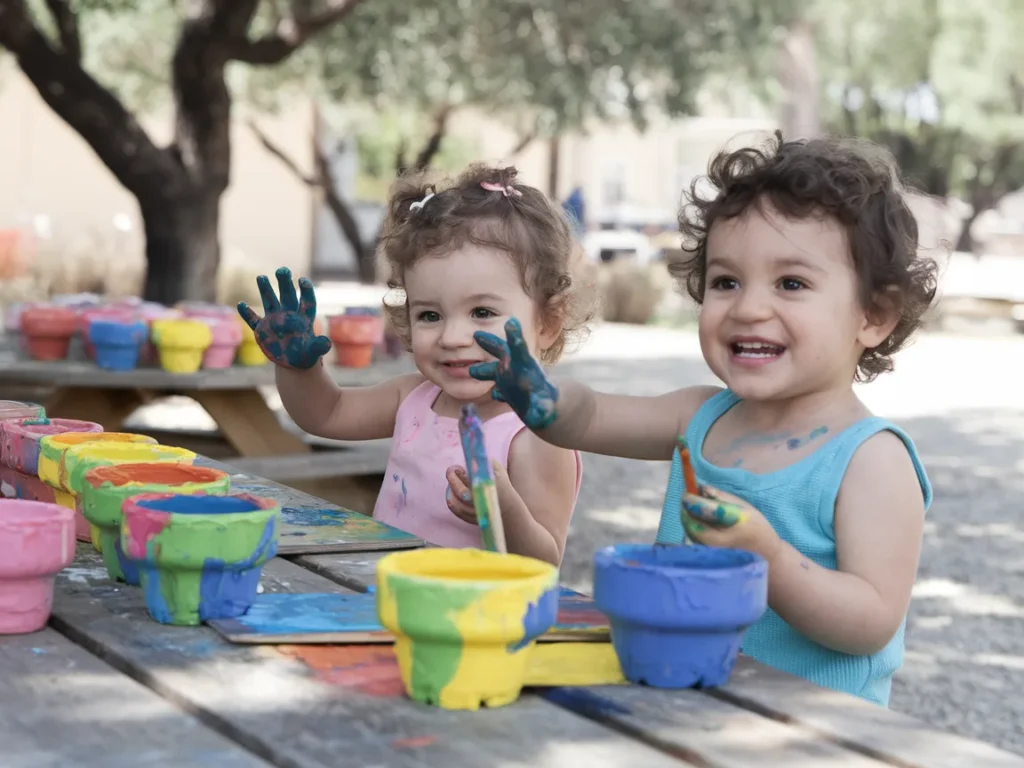
Yes, you can paint terracotta pots and make them look absolutely stunning. All you need is a clean clay pot, some acrylic paint, a brush, and about an hour of free time. The result is a custom planter that looks like it came from a fancy home store, but costs almost nothing.
Terracotta pots are one of the best surfaces for painting. The porous clay grabs onto paint beautifully, and the warm orange-brown base gives every color a rich look. Whether you want something modern and minimal, playful and bold, or rustic and aged, this guide covers all the ideas you need. You’ll also learn exactly how to prep, paint, and seal your pots so they look great for years.
Let’s turn those plain clay pots into art.
Why Terracotta Pots Are Perfect for Painting
Before we dive into the designs, let’s talk about why terracotta is the crafter’s best friend. There’s a reason people keep coming back to these humble clay pots year after year.
They’re Cheap and Easy to Find
You can grab a standard 4-inch terracotta pot for about a dollar at any garden center, hardware store, or dollar shop. Larger sizes cost a little more, but even a big 10-inch pot rarely tops five dollars. Compare that to a painted designer planter that can run thirty to sixty dollars. The savings are huge.
The Clay Holds Paint Well
Terracotta is porous. That means the clay has tiny holes that actually help paint stick to the surface. Unlike slick plastic or glazed ceramic, you don’t need heavy primers or special bonding agents. A coat of acrylic paint grabs right onto raw terracotta and dries in minutes.
They Work Indoors and Outdoors
With proper sealing, painted terracotta pots hold up on porches, patios, balconies, and garden beds. Without sealing, they’re still perfect for indoor windowsills, shelves, and desks. They’re truly go-anywhere planters.
According to research by Scotts Miracle-Gro and Wakefield, about 55 percent of American households are engaged in gardening activities. That’s over 71 million homes growing something. And all those plants need pots. Why not make them look beautiful?
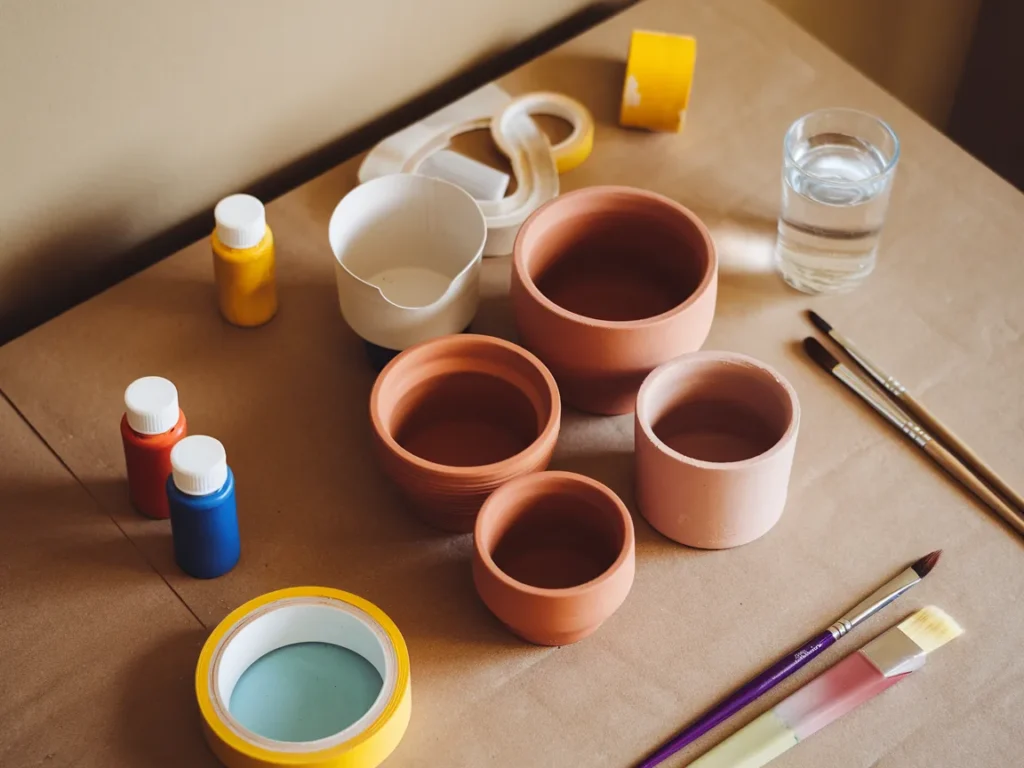
Supplies You Need for Painting Terracotta Pots
Getting the right supplies before you start makes everything smoother. Here’s what to gather.
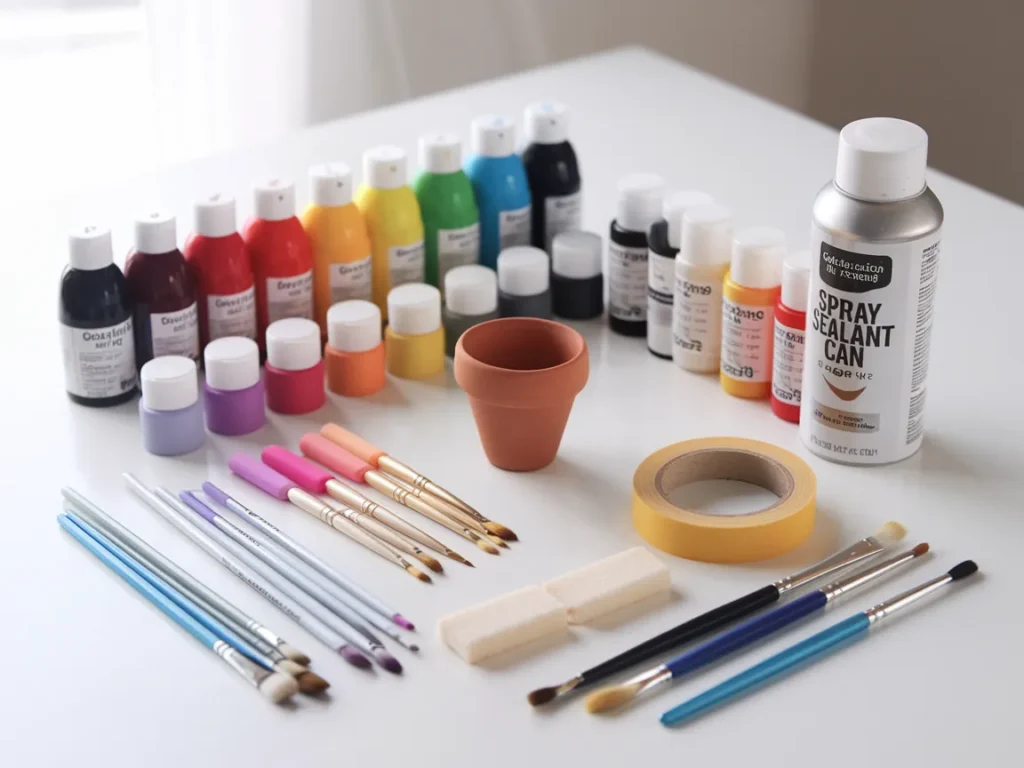
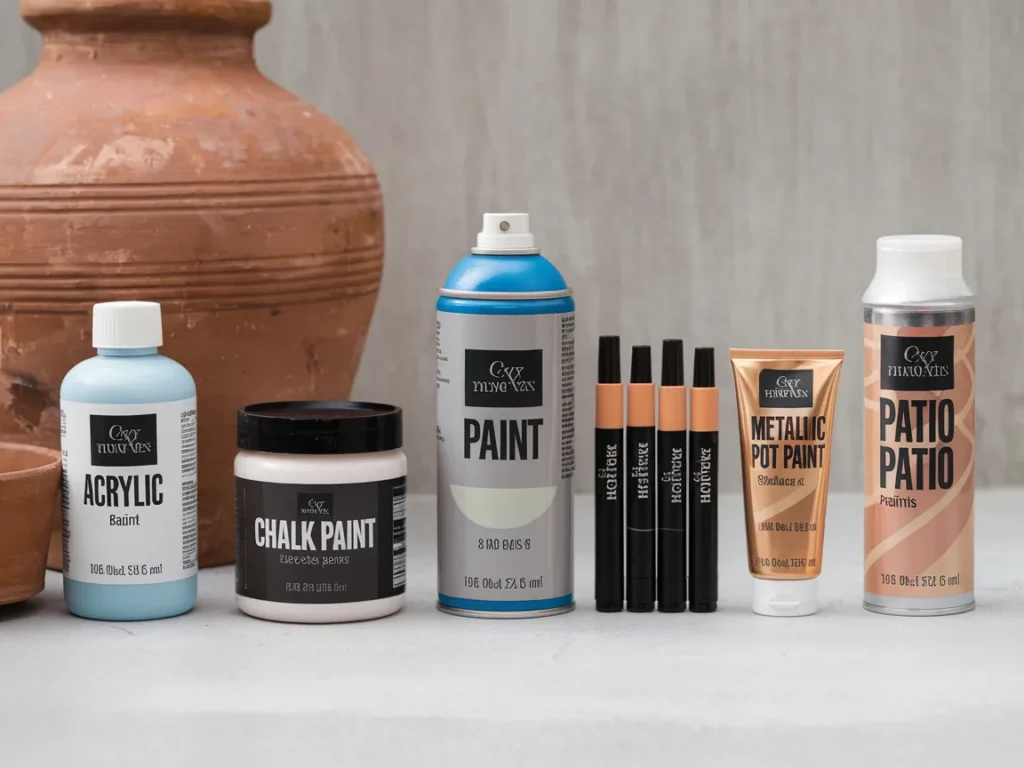
Paint Options
Acrylic craft paint is the most popular choice, and for good reason. It’s affordable, it dries fast, and it comes in every color you can imagine. For outdoor pots, grab multi-surface acrylic paint labeled for exterior use. Chalk paint gives a soft, matte finish that looks gorgeous for vintage and farmhouse styles. Spray paint works well for base coats and solid-color pots. Paint pens and markers are perfect for fine details, lettering, and thin lines.
Stay away from tempera paint and watercolors. They wash right off terracotta and won’t last.
Tools and Extras
Keep these on hand: a few flat brushes in different sizes, a thin round brush for details, foam sponge brushes for smooth base coats, painter’s tape for crisp lines, a pencil for sketching, kitchen sponges cut into shapes for stamping, and paper towels or newspaper to protect your workspace.
Sealant
A clear acrylic spray sealer is the easiest way to protect your finished pot. For outdoor use, pick one that says waterproof or UV-resistant. Mod Podge Outdoor is another solid option for weather-resistant protection. Shellac spray provides the strongest barrier, especially on the inside of pots where moisture can push through.
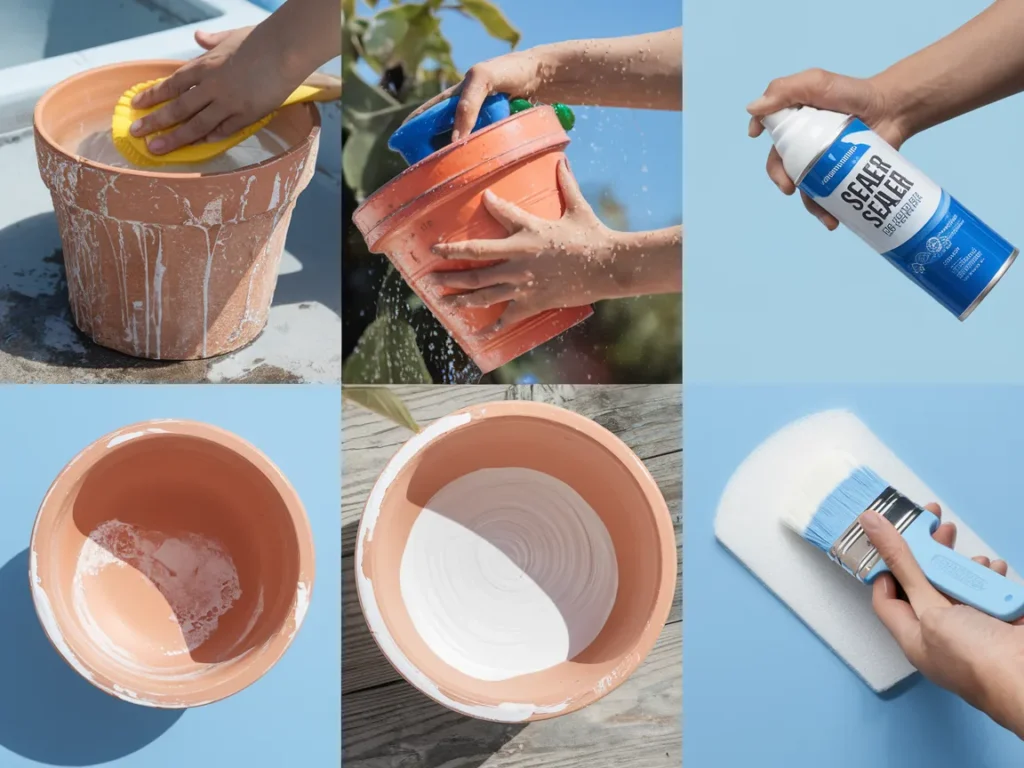
How to Prep Terracotta Pots Before Painting
This part takes ten minutes but saves you from headaches later. Skipping prep is the number one reason paint peels or looks patchy.
Step 1: Clean the Pot
Even new pots can have dust, powder, or sticker residue. Wash your pot with warm soapy water and a scrub brush. If you’re reusing an old pot, scrub harder to get off any dirt or mineral buildup. Rinse well.
Step 2: Let It Dry Completely
This is the step most people rush, and it causes problems. Terracotta absorbs water like a sponge. If you paint over a damp pot, the paint will bubble, peel, or not stick at all. Let your pot dry for a full 24 to 48 hours after washing. Set it in a sunny spot to speed things up.
Step 3: Seal the Inside (Optional but Smart)
If you plan to put a live plant in your painted pot, seal the inside first. Apply one to two coats of a clay pot sealer or shellac spray to the interior. This stops water from soaking through the clay and lifting your paint from the outside. Let the sealer dry for 24 hours before painting.
Step 4: Apply a Base Coat
Paint your pot with a solid base color. White is the most popular base because it makes every other color pop. Use a foam brush for the smoothest finish. Apply two to three thin coats, letting each one dry for about 20 minutes. Thin coats beat thick coats every time. They dry faster, look smoother, and are less likely to crack.
Simple Terracotta Pot Painting Ideas for Beginners
If you’ve never painted a pot before, start here. These ideas are low-pressure, beginner-friendly, and still look fantastic.
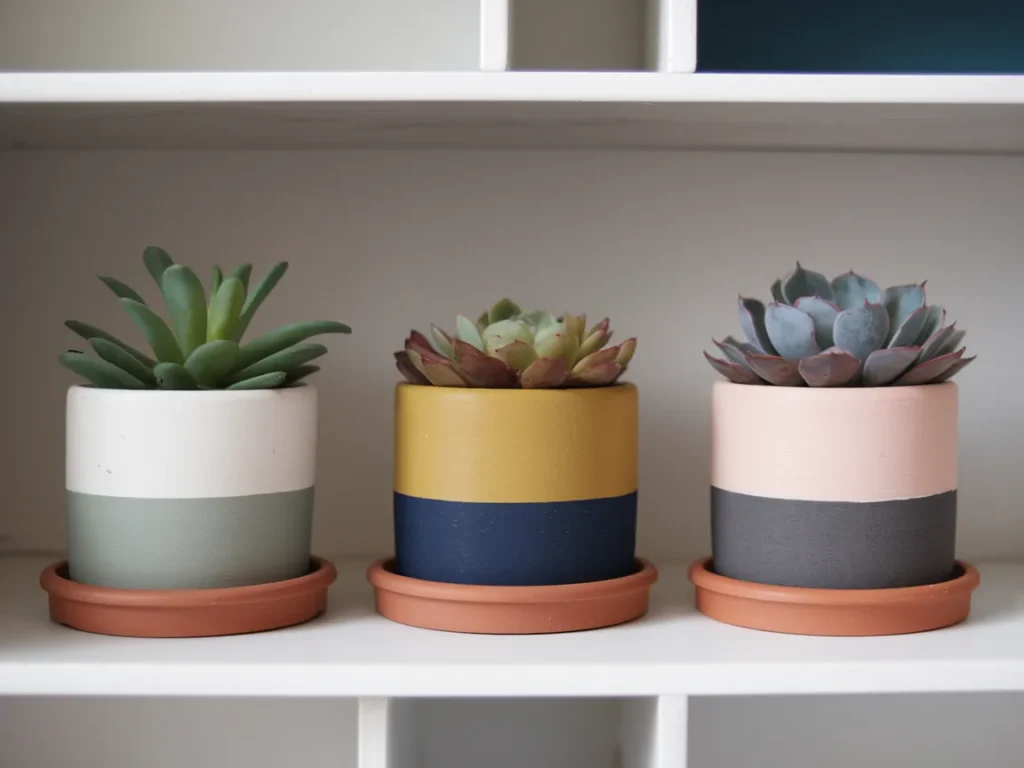
Color Block Pots
This is possibly the easiest technique on the list. Use painter’s tape to divide your pot into sections. Paint each section a different color. Peel the tape off when the paint is dry. Done. You’ll have clean, sharp lines and a modern look that takes less than thirty minutes.
Try pairing colors like white and sage green, mustard and navy, or blush pink and charcoal gray. These combinations feel current and work with almost any home decor style.
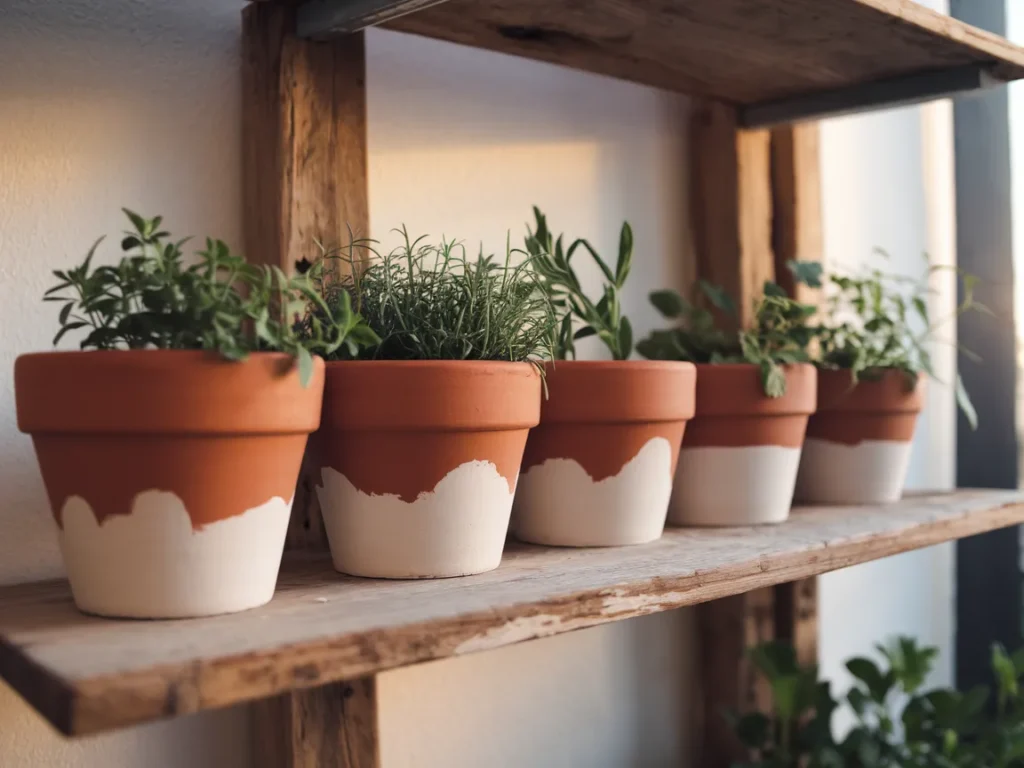
Solid Color Dip
For an even simpler look, dip the top half or bottom third of your pot into paint. Or paint it on freehand for a slightly uneven, artistic line. The contrast between the paint color and the natural terracotta looks effortlessly stylish. Gold, matte black, and crisp white are the most popular choices for this look.
This technique is perfect for grouping multiple pots together. Paint five or six pots the same color but dip each one at a different height. Line them up on a windowsill or entryway table and the effect is stunning.
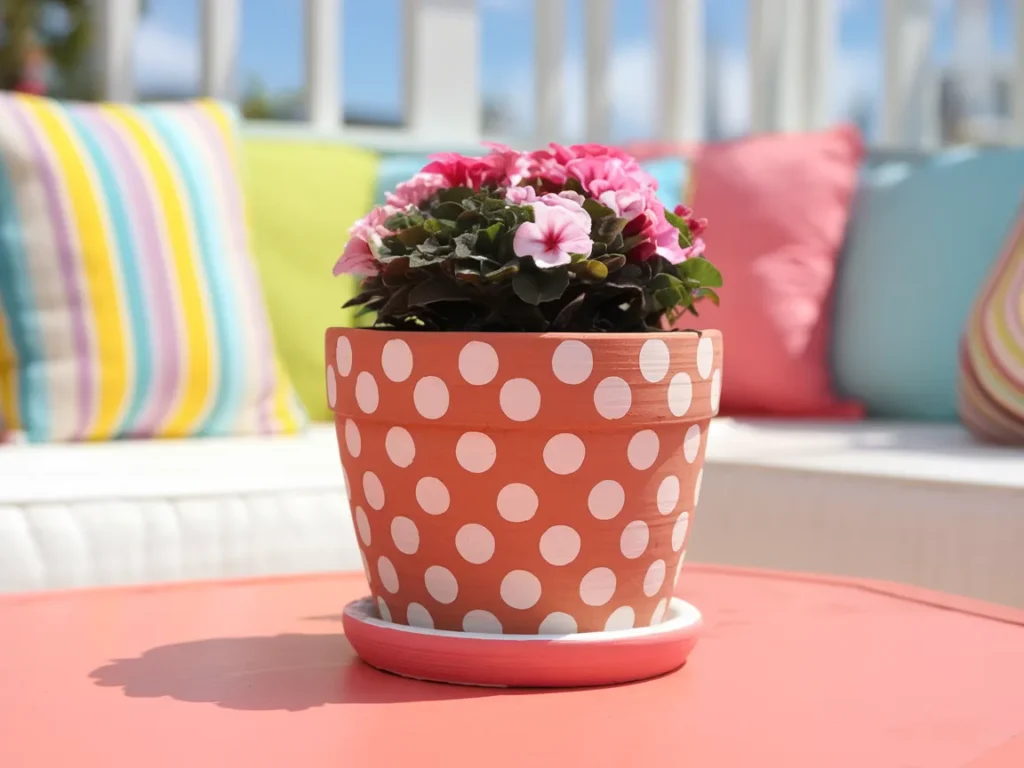
Polka Dot Pots
Grab the back end of a paintbrush or a cotton swab. Dip it in paint and start dotting. That’s the whole technique. Random dots look playful. Organized rows of dots look polished. You can use one color on a painted base or go multicolor for a confetti effect.
Kids love this one. It’s impossible to mess up, and every pot turns out charming. These polka dot planters look adorable on a balcony or kitchen counter.
Trendy Terracotta Pot Painting Ideas
Ready to step it up? These designs are on-trend for 2026 and look like something straight off a design blog.
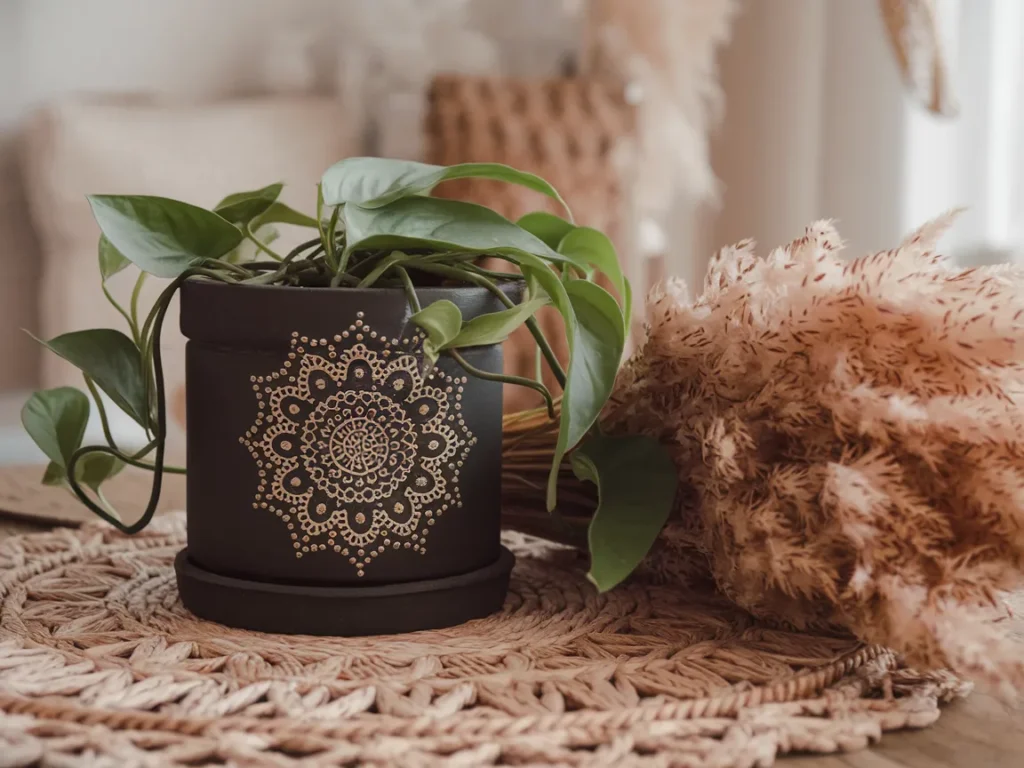
Boho Mandala Dots
Start with a dark base color like navy blue, matte black, or deep forest green. Then use the tip of a paintbrush handle to create circles of dots that radiate outward from a central point. Alternate between white, gold, and cream dots. Build layers slowly.
The result looks incredibly detailed, but the technique is just dotting in a pattern. Each ring of dots gets slightly bigger as you work outward. Boho mandala pots look amazing on their own or grouped with other earthy decor pieces. They pair beautifully with wood accent decor.
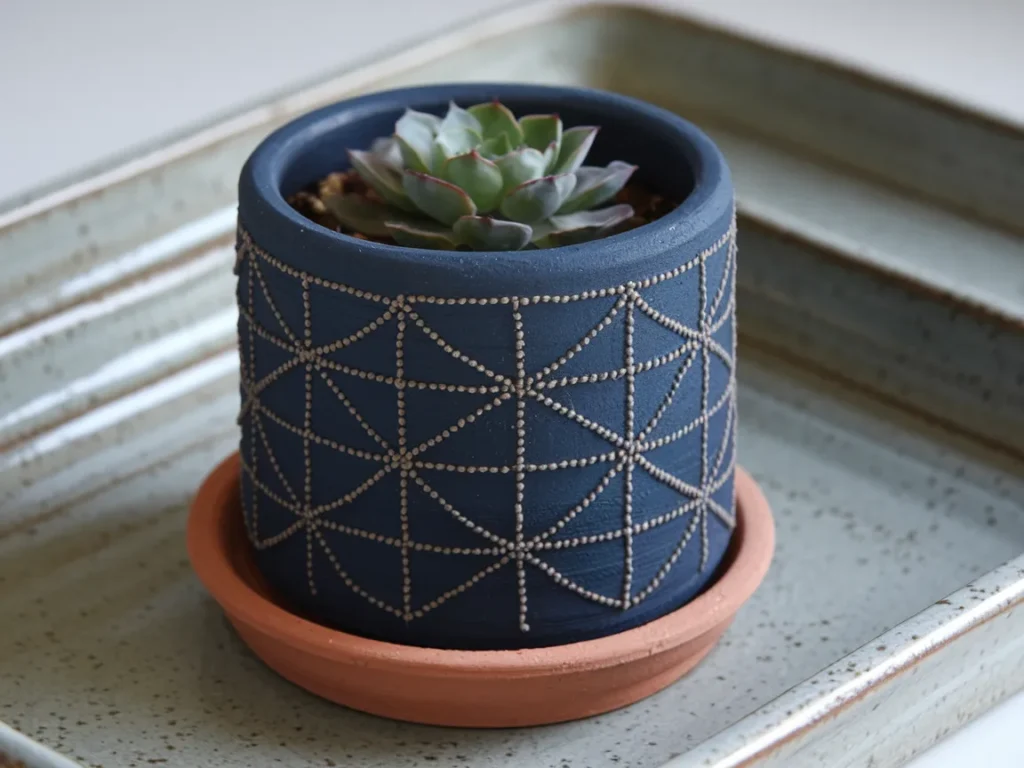
Sashiko Stitch Pattern
This is one of the coolest trends right now. Sashiko is a Japanese stitching technique that uses simple running stitch patterns to create geometric designs. You can recreate this look on a pot by painting small dashed lines in white on a dark blue or indigo base.
Common sashiko patterns include overlapping circles, crosshatch grids, and wave-like curves. The white dashes mimic thread on fabric, and the overall effect is calm, modern, and beautiful. Use a fine-tipped paint pen for the easiest application.
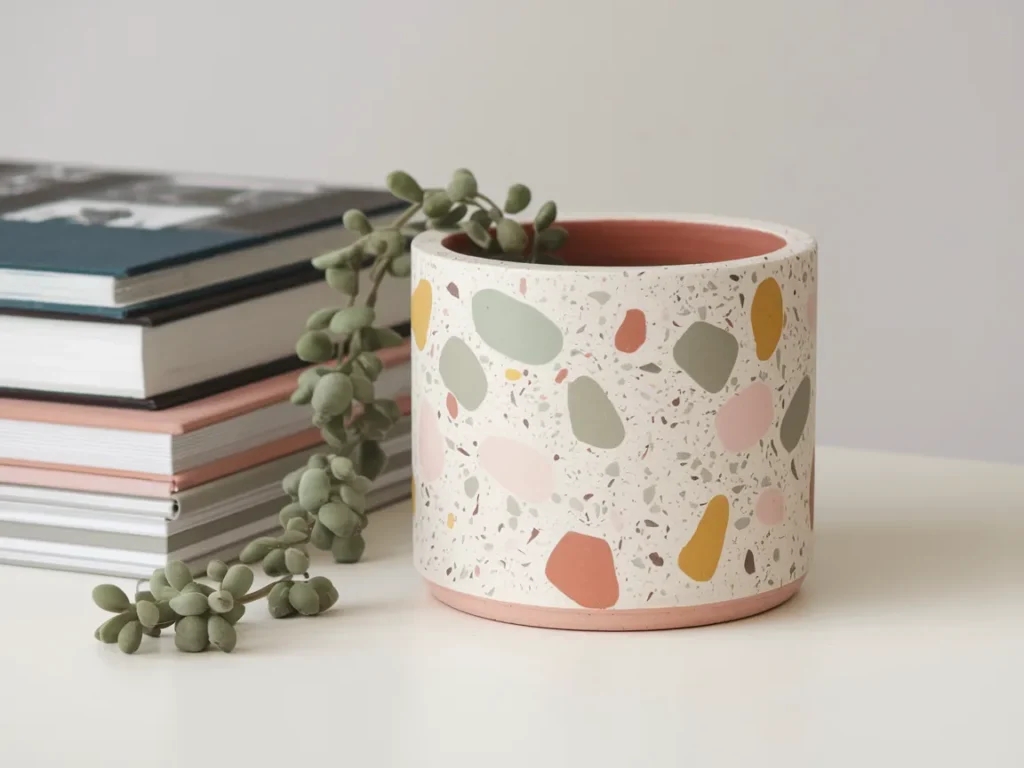
Terrazzo Speckle
Terrazzo is that speckled stone pattern you see in trendy tile and countertops. Recreating it on a pot is simple. Paint your pot a solid base color — white, blush, or light gray work best. Then use a thin brush or cotton swab to flick and dab small irregular spots of color all over.
Use muted tones like sage, dusty rose, terracotta, and mustard for a sophisticated look. Or go bright with primary colors for a fun, modern vibe. Each pot looks different, which is part of the appeal. These pots fit perfectly in a minimalist living room or on a modern desk.
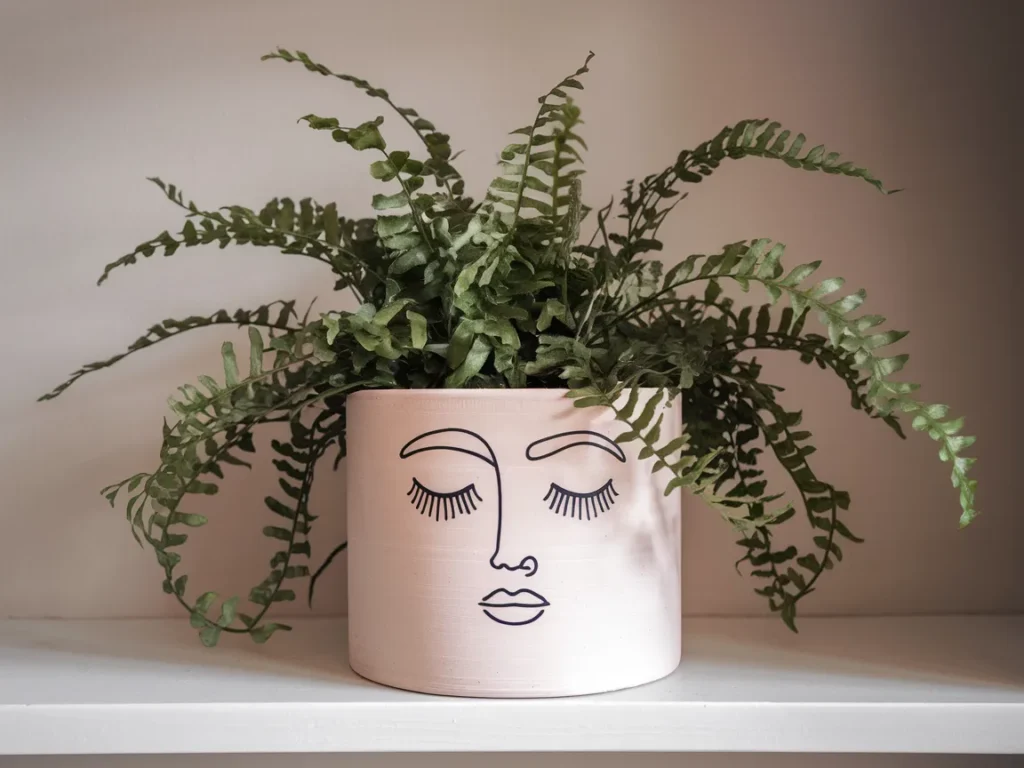
Face Planter
Draw a simple face on the front of your pot. Think closed eyes with lashes, a small nose, and soft lips. Keep the style minimal, like a line drawing. When you add a leafy plant, the foliage becomes the “hair.” A fern gives wild curls. A snake plant gives a punk mohawk. A string of pearls creates flowing locks.
Face planters have been popular for several years now, and they keep trending because they’re just so fun. They add personality to any shelf or table. They also make incredible housewarming or birthday gifts. Pair one with a small plant and wrap it with a ribbon for a present that costs under ten dollars but feels like so much more.
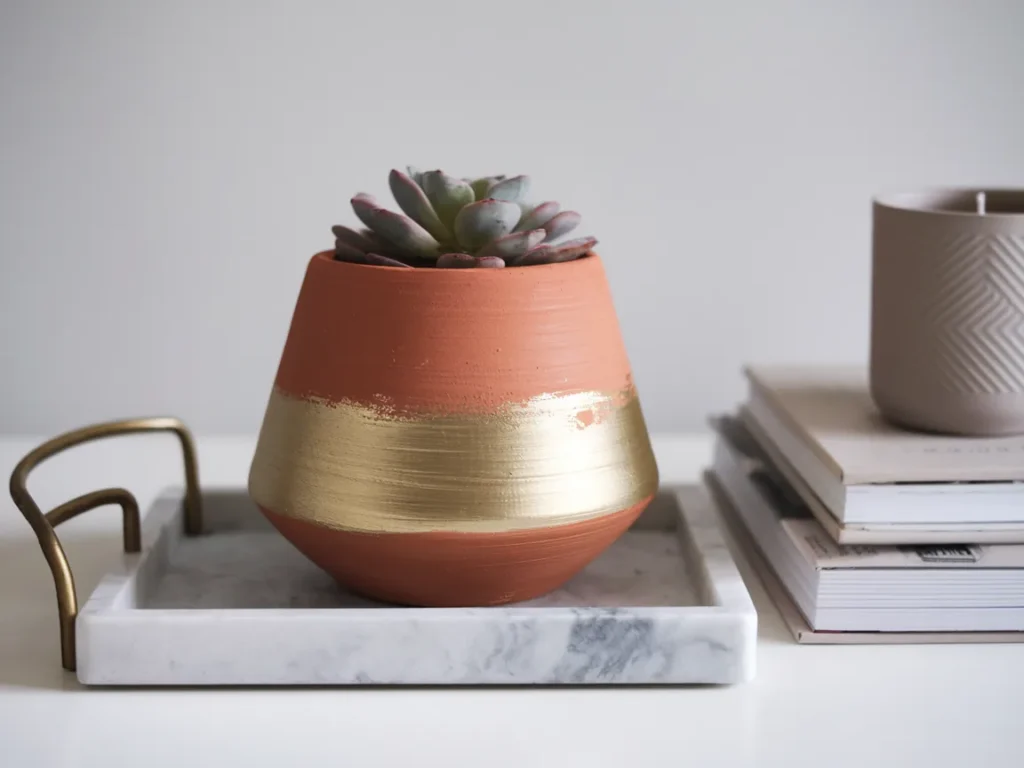
Metallic Dipped
Gold, copper, and rose gold paint can take a simple terracotta pot from basic to breathtaking. The easiest approach is painting the bottom third or the rim in metallic paint while leaving the rest as raw terracotta. The warm glow of the metal against the earthy clay is absolutely beautiful.
You can use metallic spray paint for an even finish or brush it on for a more textured, handmade look. Metallic pots look elegant in a bedroom, on a dining table centerpiece, or grouped on a mantel.
Creative Terracotta Pot Painting Ideas With Personality
These designs go beyond simple patterns and bring real character to your planters.
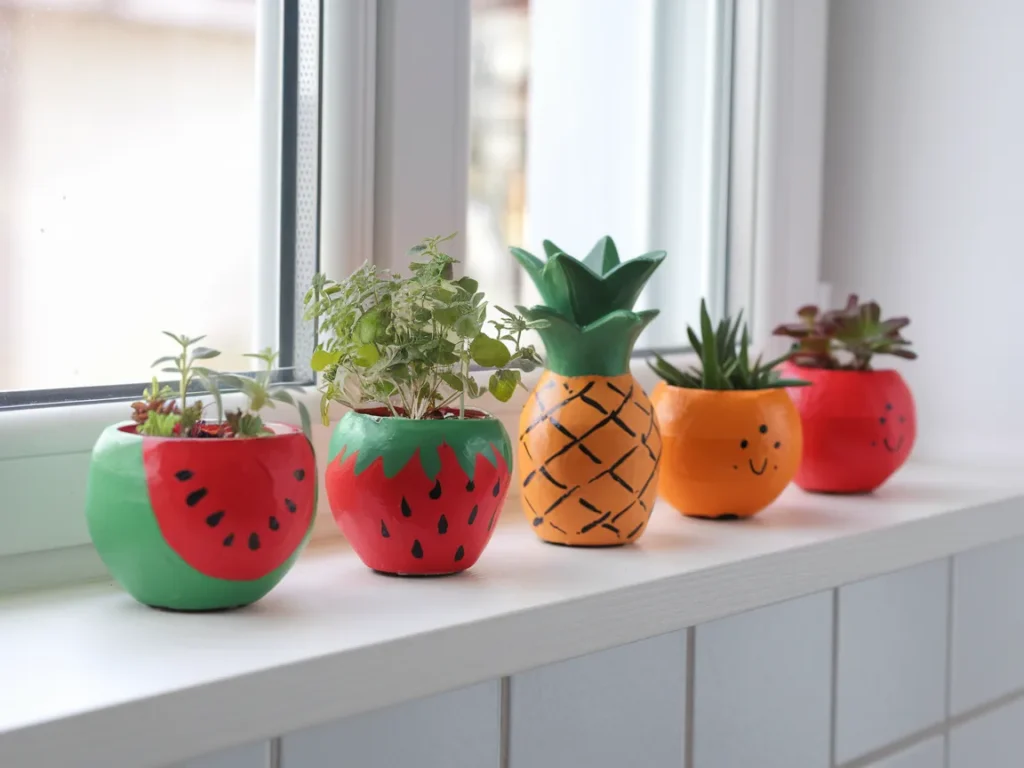
Fruit Collection Pots
Paint a set of pots to look like your favorite fruits. A watermelon pot gets a green bottom, pink body, and black seed dots. A strawberry pot is red with tiny yellow dots and a green leaf rim. A pineapple pot uses yellow crosshatch lines with a green leafy plant on top standing in for the crown.
Group three or four fruit pots together on a kitchen counter or patio table, and they instantly create a conversation. Kids love these, and they make fantastic summer craft projects.
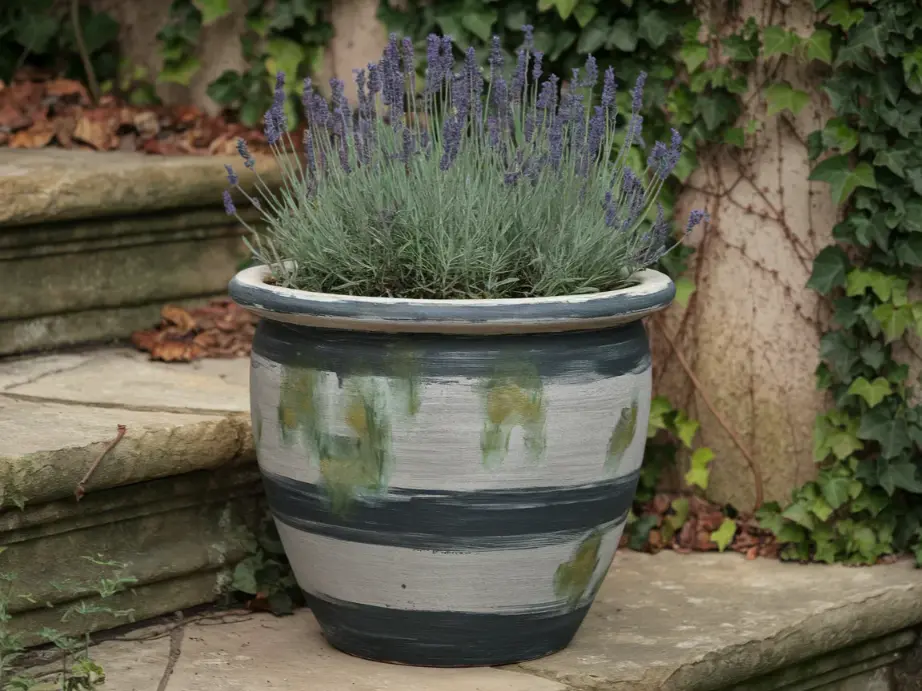
Aged Concrete Look
Not every painted pot needs to look brand new. Some of the most beautiful terracotta designs mimic the look of pots that have been weathering in a European garden for decades. Here’s the trick.
Start with a dark gray chalk paint base coat. Then dab a lighter gray over the surface using a stippling motion with a chip brush. Don’t cover everything — let patches of the dark base show through. Next, lightly sponge on small touches of green paint in a few spots to look like moss growth. Finally, drag a very light color like off-white across the raised textures using a dry brush.
The final pot looks like aged stone or old concrete. It’s gorgeous grouped with herbs, lavender, or small topiaries. If you love the vintage home decor look, this technique is for you.
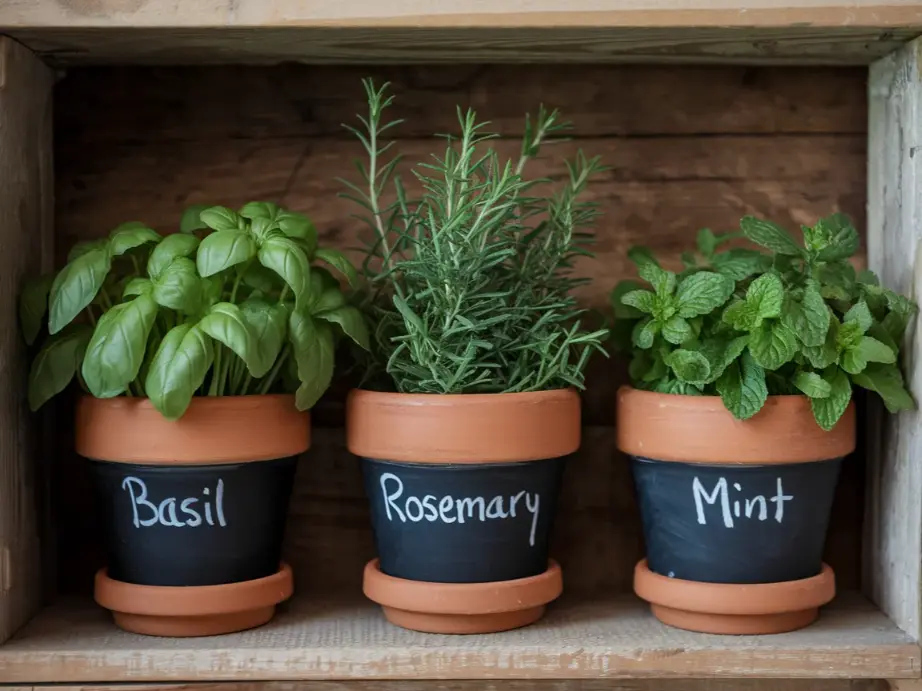
Chalkboard Label Pot
Paint the front panel or entire pot with chalkboard paint. Once it cures, you can write on it with chalk. Label your herbs: “Basil,” “Thyme,” “Cilantro.” Or write fun messages like “Don’t forget to water me” or the plant’s name.
The best part about chalkboard pots is that you can erase and rewrite whenever you want. Change the label with the seasons or when you replant. This makes them incredibly practical for a kitchen herb garden or classroom project.
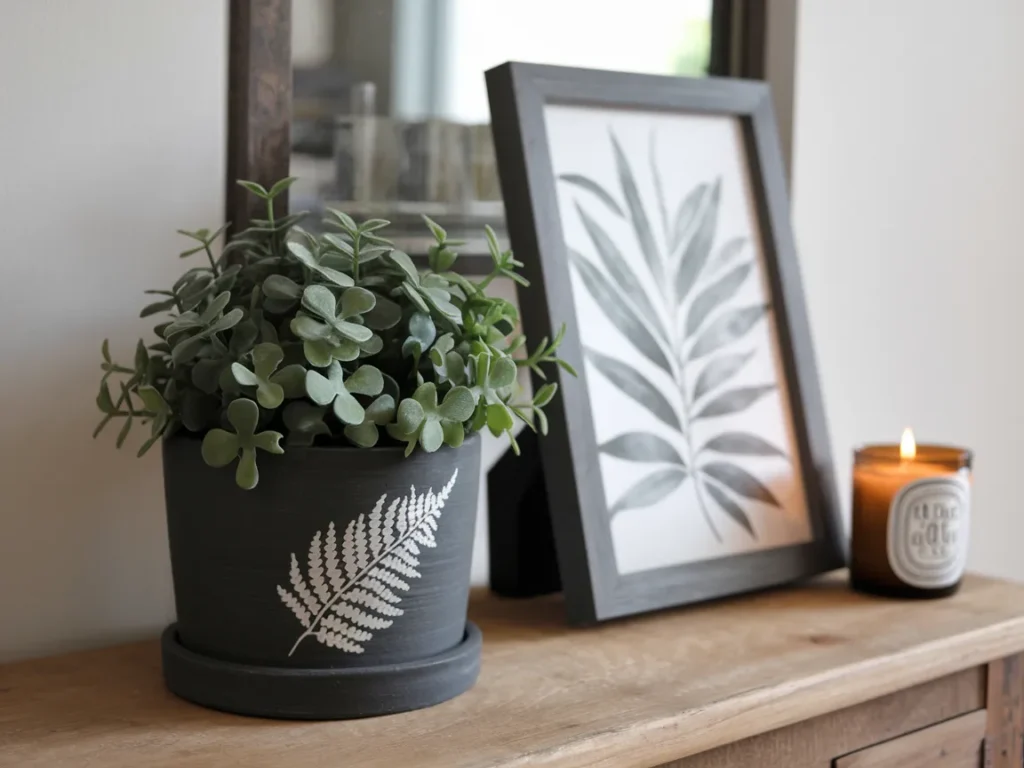
Stenciled Botanical Leaves
If freehand painting feels scary, stencils are your best friend. Buy a leaf or fern stencil, or cut one from stencil film using a Cricut or Silhouette machine. Tape the stencil to your pot, paint over it, and peel it away. Instant professional-looking botanical art.
White leaf prints on a dark green or charcoal pot look especially stunning. You can also reverse the technique — paint the pot white and stencil dark green or gold leaves on top. Either way, the result is clean, elegant, and perfect for a spring living room refresh.
Terracotta Pot Painting Ideas for Kids
Painting clay pots is one of the best crafts you can do with children. It’s hands-on, creative, and produces something they can actually keep and use.
Thumbprint Art Pots
Dip a child’s thumb in paint and let them stamp it all over the pot. Thumbprints become bees, ladybugs, flowers, or caterpillars with just a few added details from a fine brush or marker. This is a wonderful keepsake craft for Mother’s Day, Teacher Appreciation, or grandparent gifts.
Sponge Stamp Pots
Cut kitchen sponges into simple shapes — hearts, stars, circles, leaves. Let kids dip the sponges in paint and press them onto the pot. The slightly imperfect stamps give the pot a handmade charm that’s impossible to replicate with a brush.
Free Paint Pots
Sometimes the best approach with kids is no plan at all. Give them a pot, a few colors, and let them go wild. Splatter paint, brush strokes, color mixing — every choice is the right one. The results are always bright, cheerful, and full of pride.
According to a Frontdoor survey, 98 percent of American homeowners have completed at least one DIY project in their lifetime. Getting kids involved early builds that same creative confidence.
Best Paint Types for Terracotta: A Quick Comparison
| Paint Type | Best For | Finish | Dry Time | Outdoor Safe? |
|---|---|---|---|---|
| Acrylic craft paint | All designs, details | Matte to satin | 15-30 minutes | With sealer |
| Chalk paint | Vintage, distressed looks | Matte, velvety | 30-60 minutes | With sealer |
| Spray paint | Base coats, solid colors | Matte to gloss | 15-20 minutes | Most are outdoor rated |
| Paint pens/markers | Lettering, fine details | Varies | 5-10 minutes | With sealer |
| Metallic paint | Accents, dipped looks | Shimmer | 20-30 minutes | With sealer |
| Outdoor patio paint | Full outdoor exposure | Matte to satin | 30-60 minutes | Yes, built-in |
The table above gives you a quick look at what works best for each style. For most projects, regular acrylic craft paint paired with a clear sealer is all you need.
How to Seal and Protect Your Painted Terracotta Pots
Sealing is what separates a pot that lasts one season from one that looks great for years. Here’s how to do it right.
Indoor Pots
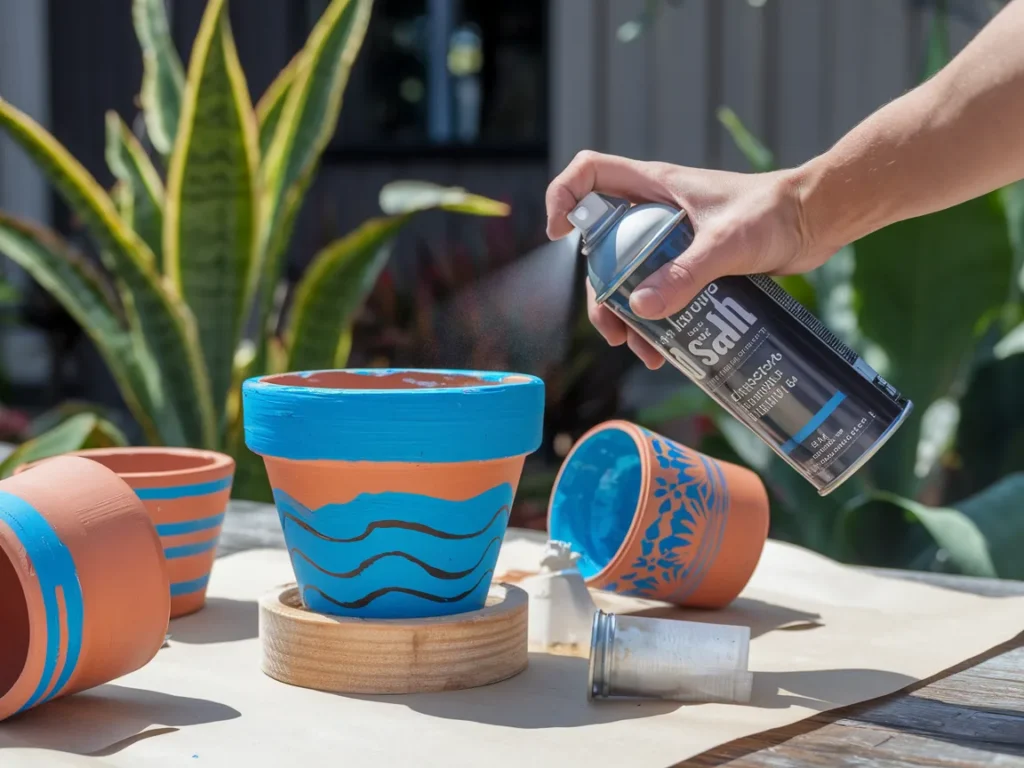
For pots that stay inside, a light seal is enough. Spray two thin coats of a clear acrylic sealer over the finished design. Choose matte for a natural look or gloss for a shiny finish. Let each coat dry for at least an hour before applying the next.
Outdoor Pots
Outdoor pots face rain, sun, heat, and cold. They need more protection. Seal the inside of the pot with a clay pot sealer or shellac spray to block moisture from pushing through the clay. After painting and letting the paint fully cure (24 hours minimum), apply two to three coats of a waterproof outdoor sealer to the entire outside surface.
Keep painted pots under a covered porch or patio whenever possible. Even the best sealers wear down over direct, constant sun and rain exposure.
How Long Does Paint Last on Terracotta?
With a good seal, acrylic paint on terracotta can last three to five years outdoors and even longer indoors. Touch up any small chips at the start of each growing season, and your pots will stay vibrant. High-quality outdoor patio paint can extend that lifespan even further since it’s formulated to resist UV rays and moisture without a separate sealer.
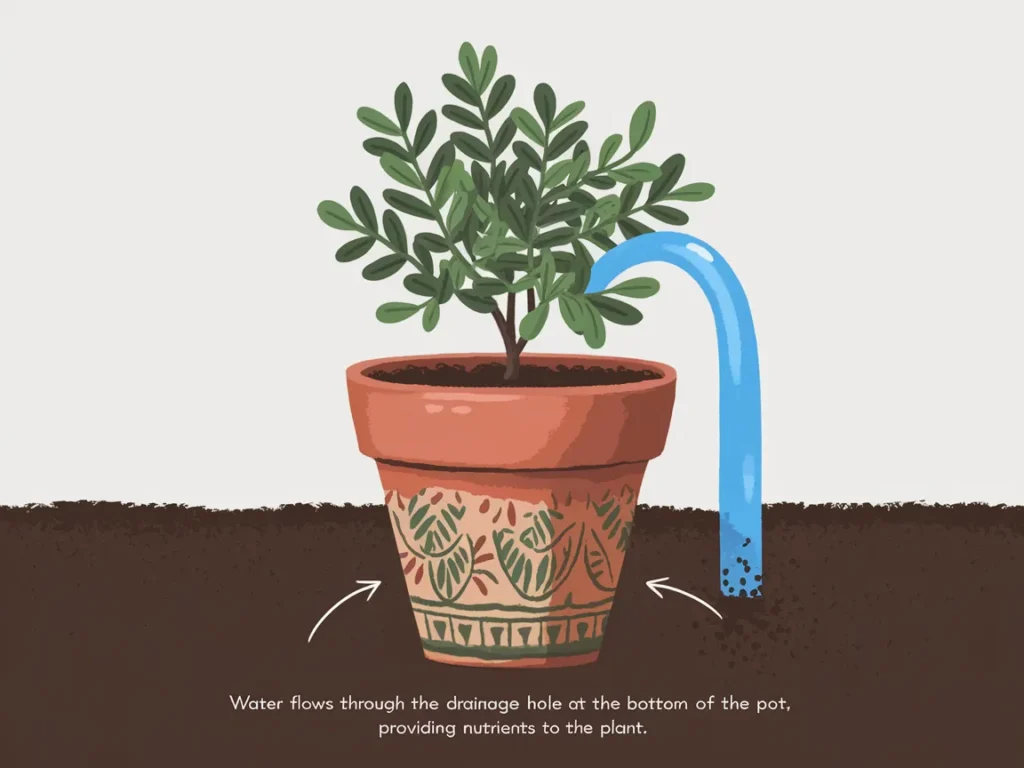
Does Painting Terracotta Affect Plant Health?
This is one of the most common questions people ask, and it’s a smart one. Terracotta is naturally porous, which means air and water can pass through the clay walls. That breathability helps plant roots stay healthy and prevents overwatering. When you paint and seal a pot, you reduce that breathability.
What This Means for Your Plants
Painted and sealed pots behave more like glazed ceramic or plastic. Water doesn’t evaporate through the walls as fast, so the soil stays wetter for longer. For most houseplants, this is perfectly fine — just water a little less often than you would in an unfinished clay pot.
If you’re growing plants that love dry soil, like cacti or succulents, make sure your pot has a drainage hole. You can also paint only the outside and leave the inside unsealed to keep some breathability. Another option is to paint just the top portion and leave the bottom half as raw clay. This gives you the decorative look you want while still letting the pot breathe where it matters most.
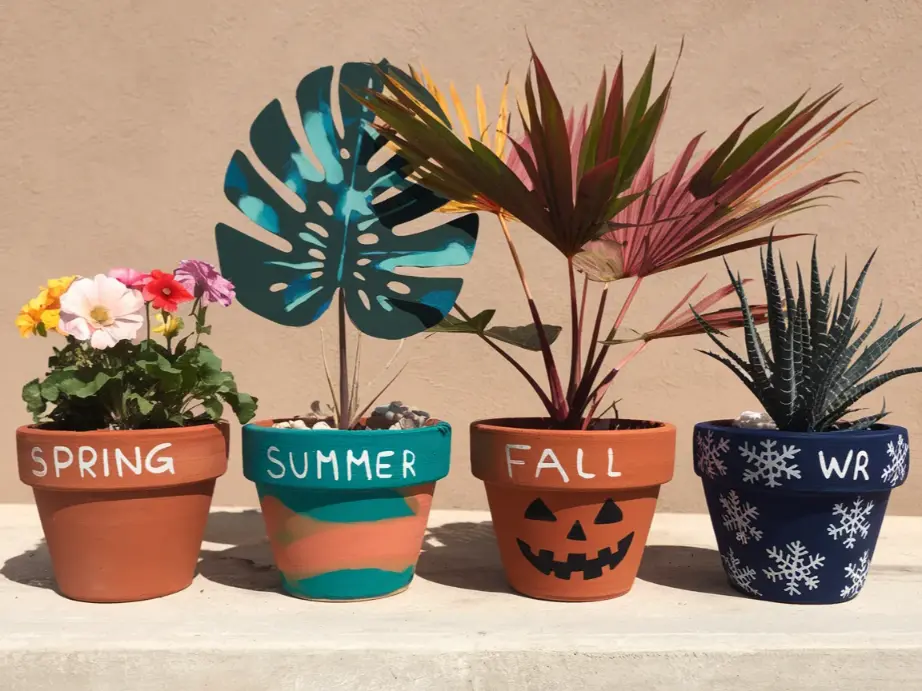
Seasonal Terracotta Pot Painting Ideas
One of the great things about terracotta pots is how well they work for seasonal decor. Instead of buying new decorations every few months, just paint new pots.
Spring
Pastel colors, painted flowers, butterflies, and bees. Line them up along your front steps with tulips or daffodils for an instant spring display.
Summer
Bright colors, fruit designs, tropical leaves, and ocean-inspired blues and greens. Perfect for a patio party or an outdoor dining space.
Fall
Warm oranges, deep reds, painted pumpkins, and rustic finishes. Group them on your front porch with mums and gourds.
Winter
White and silver snowflakes, evergreen patterns, or red and gold holiday themes. Two pots stacked and painted like a snowman make a charming holiday craft.
Frequently Asked Questions
Can You Paint Terracotta Pots With Acrylic Paint?
Yes. Acrylic paint is the most popular and practical choice for terracotta pots. It sticks well to the porous clay surface, dries in about 20 minutes, and comes in hundreds of colors. For outdoor pots, choose acrylic paint labeled for multi-surface or exterior use, and finish with a clear sealer to protect against weather.
Do You Need to Prime Terracotta Before Painting?
Priming is optional but helpful. Terracotta absorbs paint quickly because it’s porous, so your first coat may look patchy or thin. A coat of white acrylic paint or a spray primer creates a smooth, even base that helps your colors look brighter and more even. If you’re painting a light color over the dark terracotta, priming makes a big difference.
How Do You Keep Paint From Peeling Off Terracotta Pots?
Three things prevent peeling: a clean and completely dry pot before painting, thin coats of paint with proper drying time between them, and a clear sealer applied after the paint cures. For outdoor pots, seal the inside as well to stop moisture from pushing through the clay and lifting the paint from underneath.
Can You Put Painted Terracotta Pots Outside?
You can, but protection matters. Apply a waterproof outdoor sealer over the paint and seal the inside of the pot as well. Place painted pots in covered areas like porches and patios when possible. Direct sun and heavy rain will gradually fade and wear even sealed paint, so occasional touch-ups help them last longer.
What’s the Best Sealer for Painted Terracotta Pots?
For most projects, a clear acrylic spray sealer works great. For outdoor pots that will face the elements, polyurethane spray or shellac spray offers stronger protection. Mod Podge Outdoor is another popular choice that provides water resistance. Apply two to three thin coats and let the pot cure for 48 to 72 hours before exposing it to moisture.
Is Painting Terracotta Pots Bad for Plants?
Not if you take the right steps. Painting and sealing does reduce the pot’s natural breathability, which means soil dries out more slowly. Adjust your watering schedule accordingly, and make sure the pot has a drainage hole. You can also leave the inside of the pot unsealed or paint only the exterior to maintain some airflow through the clay walls.
Final Thoughts
A terracotta pot is like a blank canvas with a built-in purpose. It holds something alive, something growing. And when you add paint to that surface, you’re giving it a personality that matches your own space, your own style, and your own hands.
You don’t need to be an artist to make a beautiful painted terracotta pot. A single color dip looks sophisticated. A few dots create a mandala. A strip of painter’s tape gives you geometric lines that look store-bought. And a child’s thumbprint becomes a keepsake that lasts for years.
The best advice is simple: pick one idea from this guide and try it this weekend. Start with something small and easy. Once you see how good it looks, you’ll be reaching for the next pot before the first one dries.
Your garden, your shelf, and your front porch will thank you.
